Adding Self-Service Analytics to Fintune with Drizzle Cube
Since building Drizzle Cube, I’ve been waiting for the right opportunity to integrate it into a real production application. I decided to create that opportunity myself with the app I have been building for many years in my summer holidays (and that accelerated a lot this year due to Claude) … Fintune. It’s a very data rich application and a perfect place to test it out.
The Implementation Journey
Step 1: Adding the Module
The first step is straightforward - add drizzle-cube to your project:
npm install drizzle-cube@^0.1.28Note that if you don’t already use react or tailwind, you need to add these as well at the same time if you want to use the UI components.
Since Fintune already uses Drizzle ORM extensively, we had all the necessary database abstractions in place. If you’re not using Drizzle yet, you’ll also need to set up your database schema with drizzle-orm.
The key thing to understand is that Drizzle Cube doesn’t replace your existing data layer - it builds on top of it. Your existing Drizzle schema becomes the foundation for your semantic layer.
Step 2: Creating the Cubes
This is where the semantic layer magic happens. Instead of forcing users to understand complex database schemas, we create business-friendly cube definitions. Here’s a simplified example of our People cube, which connects directly to our existing Drizzle schema (it requires no modification at all).
My existing schema is:
export const employees = pgTable("employees", { id: serial("id").primaryKey(), employeeId: text("employeeId"), name: text("name").notNull(), active: boolean("active").notNull().default(true), email: text("email"), phone: text("phone"), githubEmployeeId: integer("github_employee_id"), githubUrl: text("github_url").default(''), githubUsername: text("github_username").default(''), githubAvatar: text("github_avatar").default(''), organisation: text("organisation") .notNull() .references(() => organisation.id, { onDelete: 'cascade' }), supplier: integer("supplier") .notNull() .references(() => suppliers.id, { onDelete: 'set null' }), employmentType: integer("employment_type") .notNull() .references(() => employmentTypes.id, { onDelete: 'set null' }), roleLevel: integer("role_level") .notNull() .references(() => roleLevels.id, { onDelete: 'set null' }), department: integer("department") .notNull() .references(() => departments.id, { onDelete: 'set null' }), position: integer("position") .references(() => positions.id, { onDelete: 'set null' }), started: text('started') .notNull() .default(sql`(CURRENT_DATE)`), finished: text('finished'), fteBasis: real("fte_basis") .default(1.0), capexPerc: real("capex_perc") .default(0.0), createdBy: text("created_by") .notNull() .references(() => user.id), created: text('created') .notNull() .default(sql`(current_timestamp)`),}, (table) => { return { orgIdx: index('idx_employees_organisation').on(table.organisation), orgActiveIdx: index('idx_employees_org_active').on(table.organisation, table.active), orgDeptIdx: index('idx_employees_org_dept').on(table.organisation, table.department), orgSupplierIdx: index('idx_employees_org_supplier').on(table.organisation, table.supplier), orgEmpTypeIdx: index('idx_employees_org_emp_type').on(table.organisation, table.employmentType), orgRoleLevelIdx: index('idx_employees_org_role_level').on(table.organisation, table.roleLevel), }});Then I created a cube for it:
import { defineCube } from 'drizzle-cube/server'import { employees, departments, suppliers } from '../../schema'
const employeesCube = defineCube('People', {  title: 'People Analytics',  description: 'Analytics for people data including costs and allocations',
  sql: (ctx) => ({    from: employees,    where: eq(employees.organisation, ctx.securityContext.organisationId)  }),
  joins: {    Departments: {      targetCube: () => departmentsCube,      relationship: 'belongsTo',      on: [{ source: employees.department, target: departments.id }]    },    Suppliers: {      targetCube: () => suppliersCube,      relationship: 'belongsTo',      on: [{ source: employees.supplier, target: suppliers.id }]    }  },
  dimensions: {    name: {      title: 'Employee Name',      type: 'string',      sql: employees.name    },
    active: {      title: 'Active Status',      type: 'boolean',      sql: employees.active    },
    startDate: {      title: 'Start Date',      type: 'time',      sql: employees.started    },
    capexPercentage: {      title: 'CAPEX Percentage',      type: 'number',      sql: sql`${employees.capexPerc} * 100`,      format: 'percent'    }  },
  measures: {    count: {      title: 'Employee Count',      type: 'count',      sql: employees.id    },
    activeCount: {      title: 'Active Employees',      type: 'count',      sql: employees.id,      filters: [() => eq(employees.active, true)]    },
    totalFte: {      title: 'Total FTE',      type: 'sum',      sql: employees.fteBasis,      format: 'number'    }  }})
The key insight here is that each cube definition transforms your raw database schema into business concepts. Users don’t need to know that FTE is stored as fteBasis or that CAPEX percentages are stored as decimals.
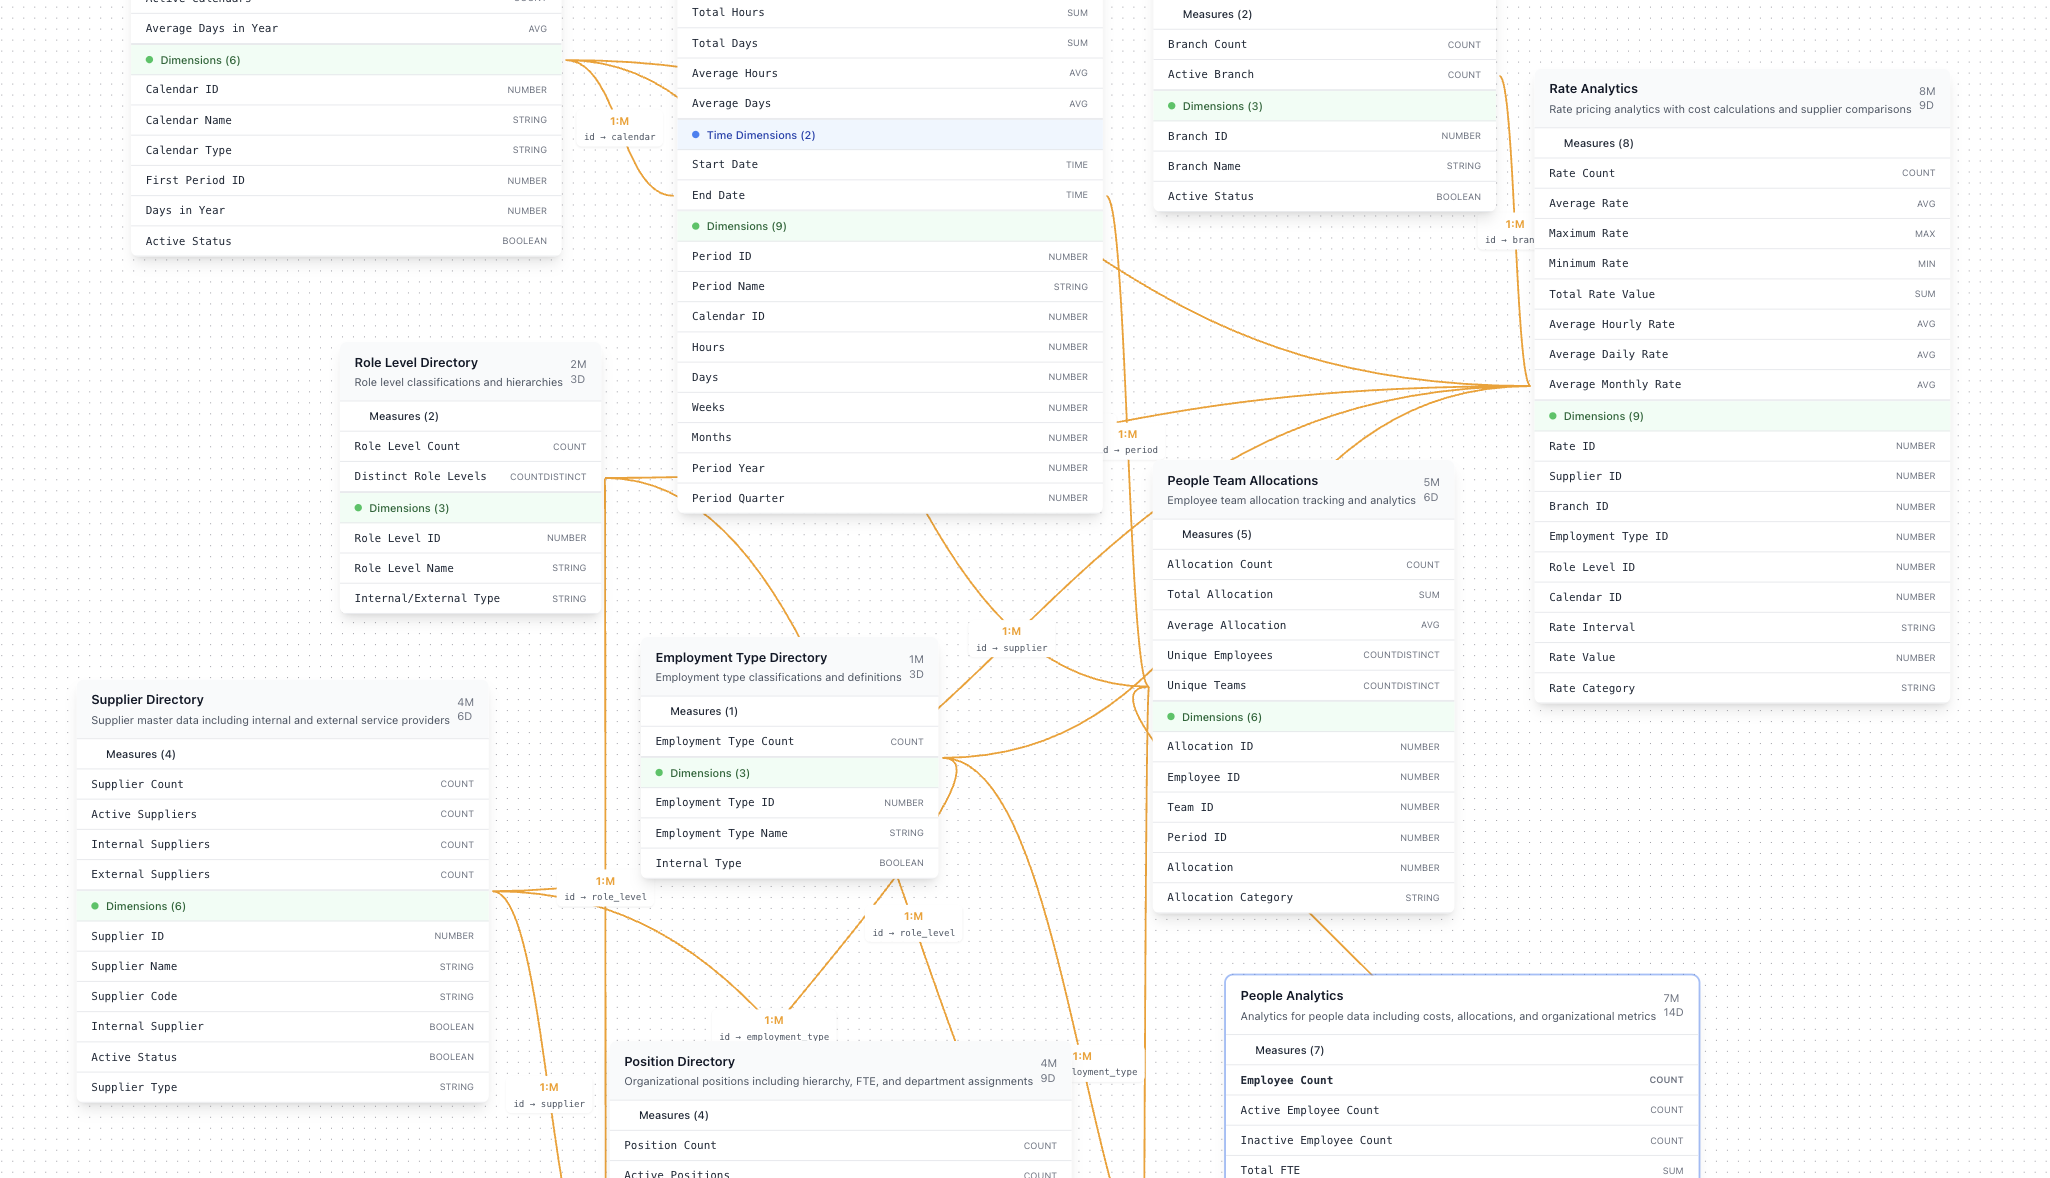
For Fintune, we created cubes for all our major entities: People, Departments, Teams, Budgets, Snapshots, and more. The joins between cubes allow users to create cross-entity reports like “Budget costs by Department” or “Employee allocation by Team over time”.
Step 3: Creating the Authentication Middleware
We implemented dual authentication - supporting both session-based auth (for the UI) and JWT token auth (for API access). This re-uses the main auth middleware the entire application uses.
First we created middleware specifically for this due to the dual auth requirement:
const cubeAuthMiddleware = async (c: any, next: any) => {  // Try session auth first  let sessionAuthSucceeded = false  try {    await authMiddleware(c, () => { // This is our existing auth      sessionAuthSucceeded = true      return Promise.resolve()    })
    if (sessionAuthSucceeded) {      const session = c.get('session')      if (session?.organisation?.id) {        return await next()      }    }  } catch (error) {    // Fall through to token auth  }
  // Try token auth if session auth failed  const authHeader = c.req.header('Authorization')  if (!authHeader?.startsWith('Bearer ')) {    return c.json({ error: 'Authentication required' }, 401)  }
  const token = authHeader.substring(7)  const decoded = jwt.verify(token, c.env.CUBEJS_API_SECRET)  const organisationId = decoded.organisation_id
  // Verify token exists in database  const orgResult = await db    .select()    .from(organisation)    .where(eq(organisation.id, organisationId))    .limit(1)
  if (!orgResult.length || orgResult[0].cubeToken !== token) {    return c.json({ error: 'Invalid token' }, 401)  }
  // Create synthetic session for compatibility  c.set('session', {    user: { id: 'system', email: 'cube-api@system' },    organisation: { id: organisationId },    role: 'member'  })
  return await next()}
This dual approach means users get seamless access through the UI, while external tools can use API tokens for programmatic access. In Fintune an organisation owner can choose to enable the CubeJS api by creating a token (or revoking it) - this is what is being checked here.
Step 4: Setting up the Adapter and Routes
Fintune uses Hono for our API layer (deployed on Cloudflare Workers), so we used the Hono adapter. The setup is simple, I created a new route and used the in-built hono adapter from drizzle-cube:
import { Hono } from 'hono'import { createCubeApp } from 'drizzle-cube/adapters/hono'import * as schema from '../server-libs/database/connection' // The existing schemaimport { allCubes } from '../server-libs/semantic-layer-v2/cubes'  // Cube definitions from Step 2
const cubeApiApp = new Hono<{ Bindings: Env; Variables: Variables }>()
// Apply authentication firstcubeApiApp.use('*', cubeAuthMiddleware) // Using the middleware defined in Step 3
// Initialize database per requestcubeApiApp.use('*', async (c, next) => {  const { drizzle } = await import('drizzle-orm/neon-http')  const { neon } = await import('@neondatabase/serverless')  const client = neon(c.env.NEON_DB)  c.set('db', drizzle(client, { schema }))  await next()})
// Create and forward to cube appcubeApiApp.use('*', async (c) => {  const db = c.get('db')  const session = c.get('session')
  const cubeApp = createCubeApp({    cubes: allCubes,    drizzle: db,    schema,    extractSecurityContext: async () => ({      organisationId: session.organisation.id,      userId: session.user?.id || null,      role: session.role || 'member'    }),    engineType: 'postgres'  })
  return await cubeApp.fetch(c.req.raw)})
export default cubeApiApp
Pay close attention to the security context - it is defined in the context of a request so it can use the session:
const extractSecurityContext = async () => {  if (session?.organisation?.id) {    return {      organisationId: session.organisation.id,      userId: session.user?.id || null,      role: session.role?.role || 'member'    }  }
  throw new Error('No authenticated session found in middleware context.')}
Note that the cubeApp is defined within the request context. so we can use the session in the extractSecurityContext.
The pattern here is important: the middleware handles authentication and database setup, then forwards the request to the cube app. This keeps the security boundary clear and integrates seamlessly with our existing auth system.
Note this example is more complex than it needs to be, as we have the dual authentication setup to allow the cubejs api to also be used as an external API. If you only wanted it to be avaialable to users within your app this could of course much simpler.
Step 5: Building Analytics Pages
The final step is creating the UI that lets users interact with all this data. Fintune’s analytics page uses the built-in React components from Drizzle Cube:
import React, { useState, useCallback } from 'react'import { AnalyticsDashboard } from 'drizzle-cube/client'import type { DashboardConfig } from 'drizzle-cube/client'
export default function AnalyticsPageV2() {  const { session } = useAuth()  const [hasUnsavedChanges, setHasUnsavedChanges] = useState(false)
  // Load saved analytics pages from our API  const { data: analyticsPages } = useAnalyticsPages()  const updatePageMutation = useUpdateAnalyticsPage()
  const currentPage = analyticsPages?.data?.[activeTab]  const dashboardConfig: DashboardConfig = {    portlets: currentPage?.config.portlets || defaultPortlets,    layouts: currentPage?.config.layouts || {}  }
  const handleSave = useCallback(async (config: DashboardConfig) => {    if (!currentPage) return
    const dbConfig = {      portlets: config.portlets,      layouts: config.layouts    }
    await updatePageMutation.mutateAsync({      id: currentPage.id,      data: { config: dbConfig }    })  }, [currentPage, updatePageMutation])
  return (    <div className="container mx-auto p-4">      <div className="flex items-center justify-between mb-6">        <h1 className="text-3xl font-bold">Analytics Dashboard</h1>        <button onClick={handleCreateExample} className="btn btn-primary">          Create Example Page        </button>      </div>
      <AnalyticsDashboard        config={dashboardConfig}        apiEndpoint="/api/semantic-layer-v2"        onConfigChange={handleConfigChange}        onSave={handleSave}        onDirtyStateChange={setHasUnsavedChanges}        enableAI={true}        showDebug={false}      />    </div>  )}
The AnalyticsDashboard component handles all the complex interactions - drag and drop, query building, chart configuration, and more. You just need to provide the configuration and handle saves.
What’s particularly nice is that users can build queries using natural language through the AI assistant, or use the visual query builder for more precise control.
To ensure that all of the tailwind styles are added to your project, you also need to ensure that you are parsing the drizzle-cube components in tailwind:
// inside your tailwind.config.tscontent: [ "./index.html", "./src/**/*.{js,ts,jsx,tsx}", "./src/pages/**/*.tsx", "./src/components/**/*.tsx", "./node_modules/drizzle-cube/**/*.{js,ts,jsx,tsx}", ],Finally, I added a new schema and API so that dashboard changes could be saved to the database via the updatePageMutation - the example below for retrievign and creating a new dashboard page in Fintune
import { Hono } from 'hono';import { eq, and, desc, asc } from 'drizzle-orm';import { authMiddleware } from '../middleware/auth';import { analyticsPages } from '../schema';import { guardPermission } from '../middleware/permissions';
const analyticsApp = new Hono<{  Bindings: Env  Variables: Variables}>();
// Apply auth middleware to all routesanalyticsApp.use('*', authMiddleware)
// Get a specific analytics pageanalyticsApp.get('/:id', async (c) => {  const permissionError = guardPermission(c, 'read', 'Organisation');  if (permissionError) return permissionError;
  const { db, session } = c.var;  const id = parseInt(c.req.param('id'));
  if (isNaN(id)) {    return c.json({ error: 'Invalid page ID' }, 400);  }
  try {    const page = await db      .select()      .from(analyticsPages)      .where(        and(          eq(analyticsPages.id, id),          eq(analyticsPages.organisation, session.organisation.id),          eq(analyticsPages.isActive, true)        )      )      .limit(1);
    if (page.length === 0) {      return c.json({ error: 'Analytics page not found' }, 404);    }
    return c.json({ data: page[0] });  } catch (error) {    console.error('Error fetching analytics page:', error);    return c.json({ error: 'Failed to fetch analytics page' }, 500);  }});
// Create a new analytics pageanalyticsApp.post('/', async (c) => {  const permissionError = guardPermission(c, 'manage', 'Organisation');  if (permissionError) return permissionError;
  const { db, session } = c.var;
  try {    const body = await c.req.json();    const { name, description, config, order = 0 } = body;
    if (!name || !config || !config.portlets) {      return c.json({        error: 'Missing required fields: name, config, or config.portlets'      }, 400);    }
    // Validate portlets structure    if (!Array.isArray(config.portlets)) {      return c.json({ error: 'Config portlets must be an array' }, 400);    }
    const newPage = await db      .insert(analyticsPages)      .values({        name,        description,        order,        organisation: session.organisation.id,        config,        createdBy: session.user.id      })      .returning();
    return c.json({ data: newPage[0] }, 201);  } catch (error) {    console.error('Error creating analytics page:', error);    return c.json({ error: 'Failed to create analytics page' }, 500);  }});
// All other route end points continue ...
And the schema:
/** * Analytics Pages - Persistent storage for analytics dashboard configurations */export const analyticsPages = pgTable("analytics_pages", { id: serial("id").primaryKey(), name: text("name").notNull(), description: text("description"), order: integer("order").notNull().default(0), organisation: text("organisation") .notNull() .references(() => organisation.id, { onDelete: 'cascade' }), config: jsonb("config").notNull(), isActive: boolean("is_active").notNull().default(true), createdBy: text("created_by") .notNull() .references(() => user.id), created: text('created') .notNull() .default(sql`(current_timestamp)`), updated: text('updated') .notNull() .default(sql`(current_timestamp)`)}, (table) => ({ orgIdx: index('idx_analytics_pages_organisation').on(table.organisation), orgActiveIdx: index('idx_analytics_pages_org_active').on(table.organisation, table.isActive), orgOrderIdx: index('idx_analytics_pages_org_order').on(table.organisation, table.order)}));The Results
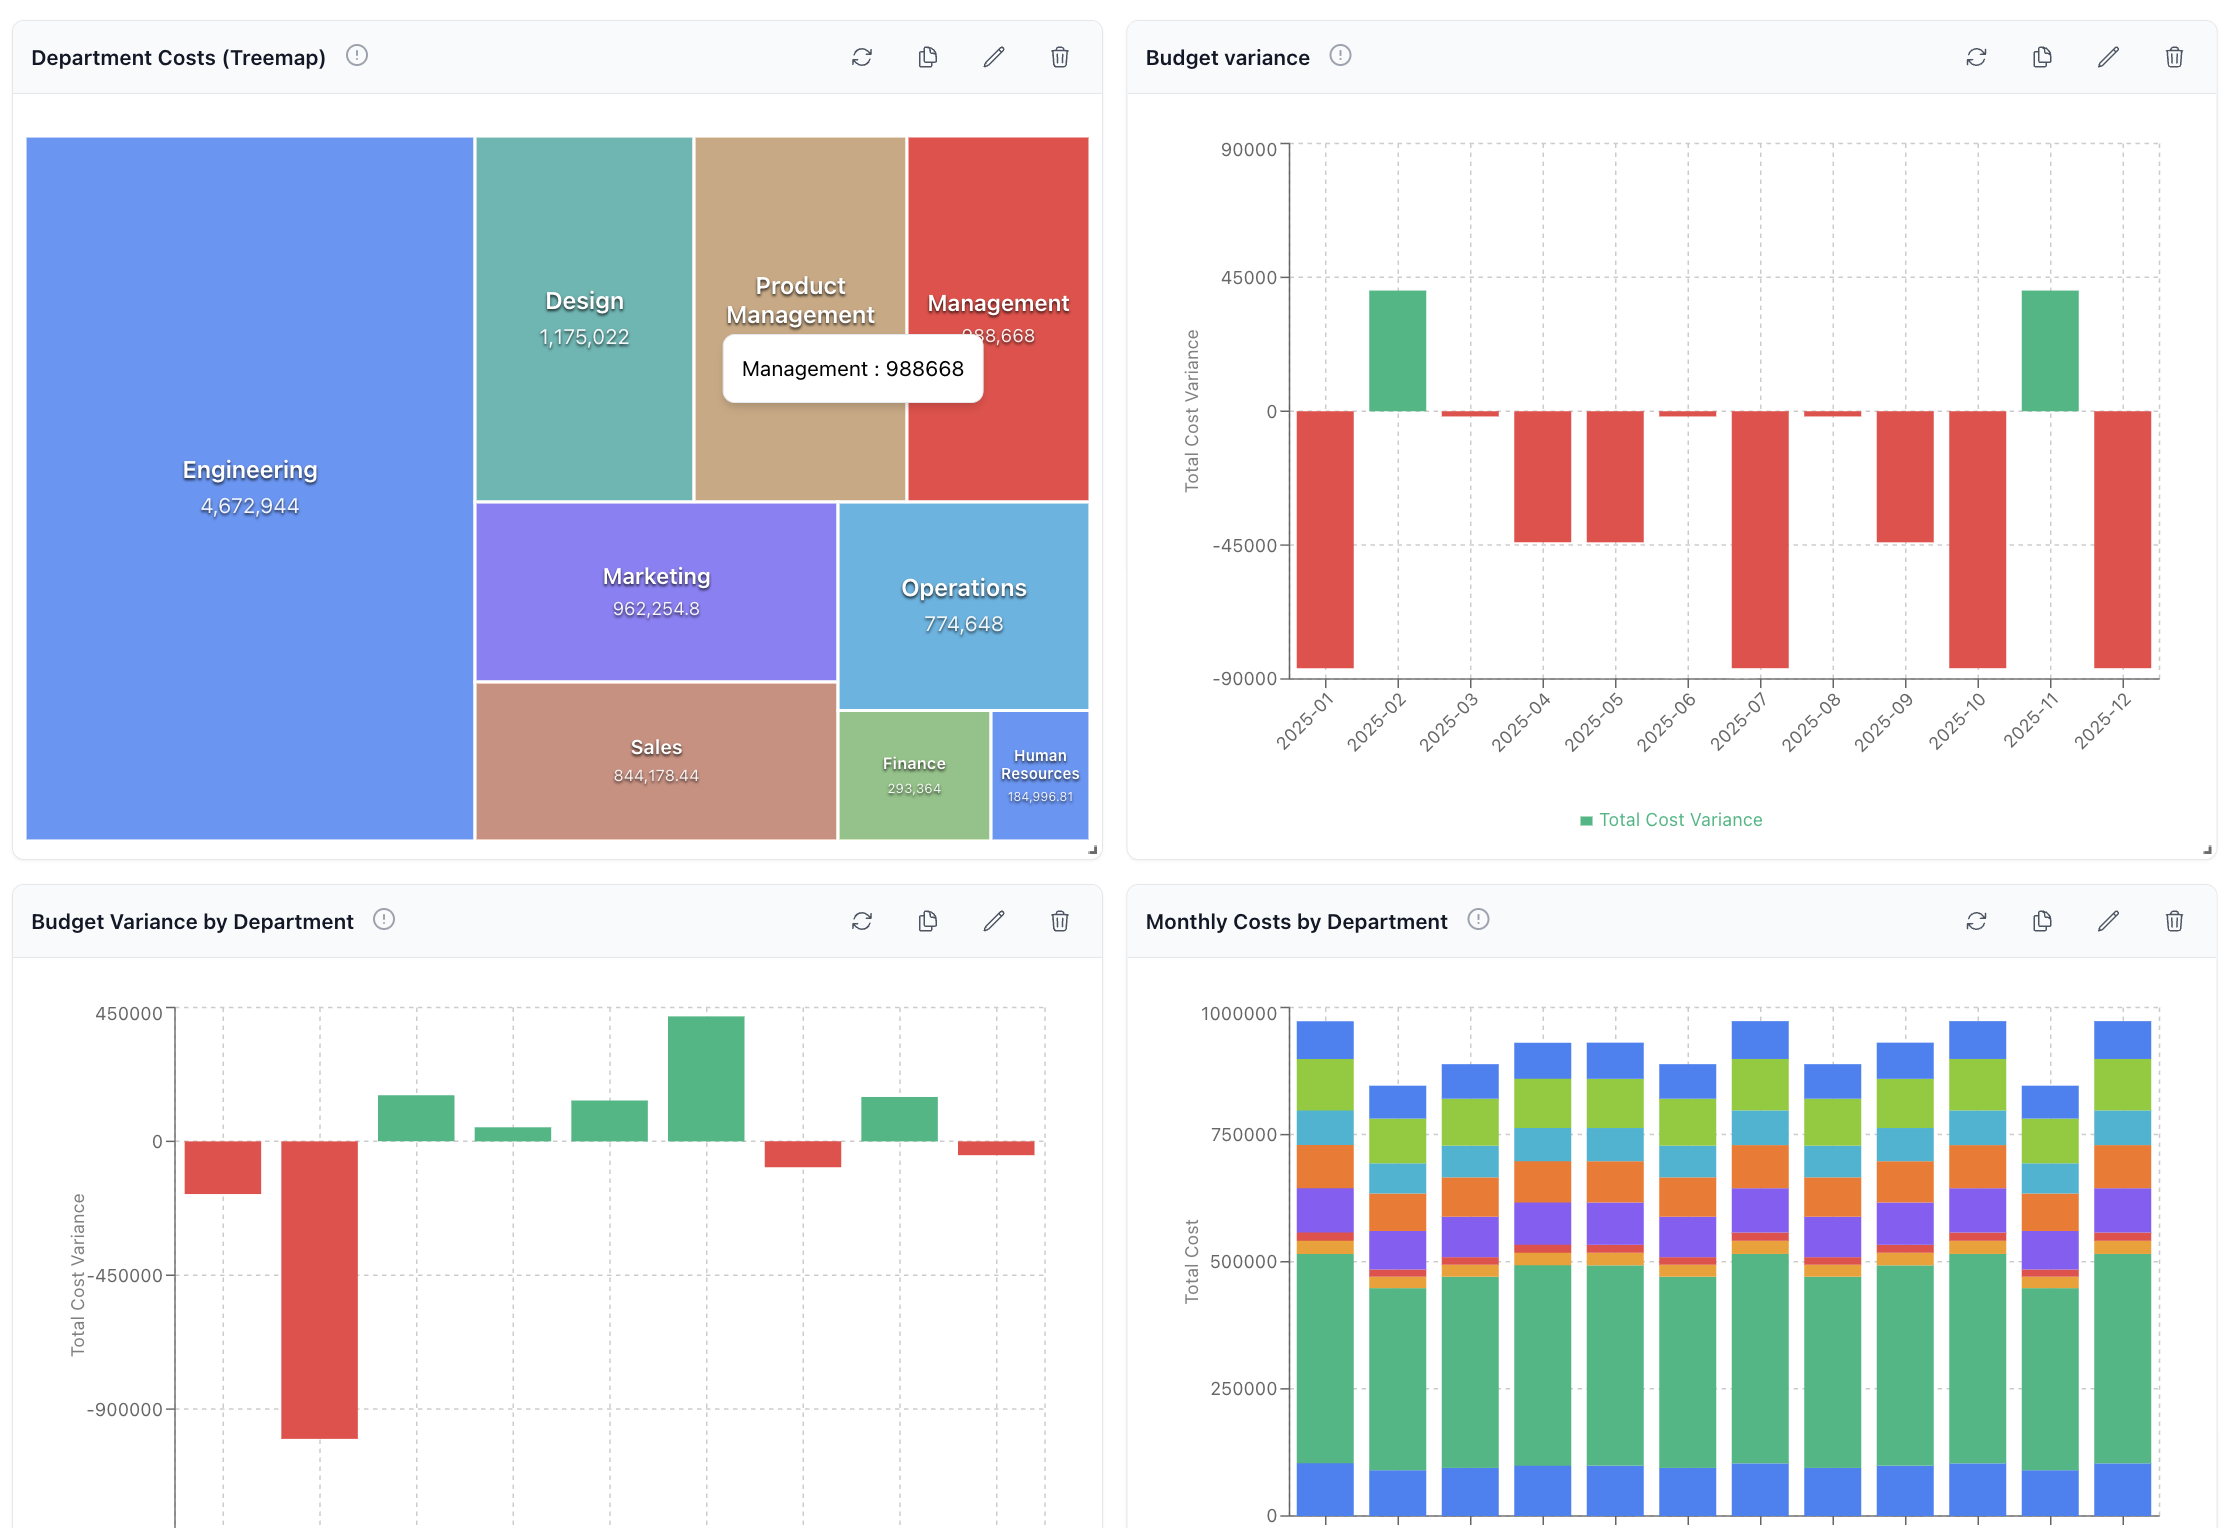
After a few hours of integration work, we now have a fully functional analytics platform embedded in Fintune. Users can:
- Create custom dashboards with drag-and-drop portlets
- Build complex queries across multiple data entities
- Use AI to generate charts from natural language
- Share dashboards with their teams
- Have a rich API for external integration
The implementation was surprisingly straightforward.
Key Takeaways
If you’re considering adding analytics to your SaaS application, here’s what I learned:
-
Security first: Get your security context extraction right from the start. Multi-tenant applications need bulletproof data isolation.
-
Think business, not database: Your cube definitions should reflect how users think about data, not how it’s stored in your database.
-
Start simple: Begin with a few core cubes and expand based on user feedback. Don’t try to expose every table on day one.
-
Leverage existing patterns: If you’re already using Drizzle ORM, the semantic layer builds naturally on top of your existing schema definitions.
-
Plan for scale: Consider how your queries will perform as data grows. The join resolver in Drizzle Cube handles many optimization challenges, but thoughtful cube design still matters.
The best part? Our users immediately started creating reports we never would have thought to build ourselves. That’s the real power of self-service analytics - unleashing user creativity on their own data.
What started as a simple integration project has become one of our most-used features. Sometimes the best product decisions are the ones that get out of your users’ way and let them solve their own problems.
If you want to see this in action, you can try the Drizzle Cube playground or check out the documentation to get started with your own implementation.